Who can use this feature:![]() All accounts.
All accounts.![]() Users with Administration permissions.
Users with Administration permissions.
Jump to:
Introduction
The Kobas model operates around discrete venues within your account. This allows you to have different till menus and settings between your venues. This article looks at the following elements of the Venue set up.
Warning: Any actions taken within these pages will not automatically order equipment or make changes to your billing. Please discuss any additional requirements or changes necessary to your account with your Account Manager, your Sales Team contact or our Accounts Team.
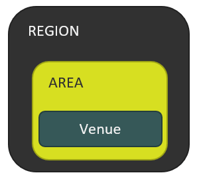
Venue Areas and Regions
We begin by defining the areas that our venues operate within, located in Administration > Venue Territories. On this page, Areas and Regions can be created, and their respective managers assigned. For smaller companies, you can leave these settings so that all venues are in the "Default" region and area.
When creating a New or Editing an existing Area/Region, you will have the option to change Name, Parent Region (if an Area), Managers, and Lead Venues (if an Area). Adding an Area/Regional manager is done by selection from a drop down list of already existing "current staff". A Venue Manager is outlined in the section below.
Our Staff User Permission Level system, often distinguishes between "own" and "all" venues. This allows you to specify hierarchical management with relevant permissions:
- Venue Manager - a staff member will inherit all Venues they are Venue Manager for as their "own venues" in relation to reporting and access levels.
- Area/Regional Manager - a staff member will inherit all Venues within their Area/Region as their "own venues" in relation to reporting and access levels.

Venues can be allocated to their Areas and be allocated a manager, in the Venue Settings page.

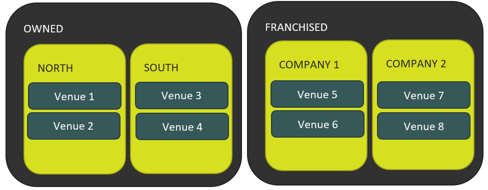
Franchising configuration
The above settings allow for top-down management within a Franchisee based setting. By use of a Region or an Area for a Franchised section of your business, you can configure the Staff User Permission Levels, so that staff in each Franchise of your business cannot see other franchises or overarching business data.
Top tip: Contact your Account Manager or our Sales Team for further information on how Kobas supports Franchising your business.
Multi-Venue Ordering configuration
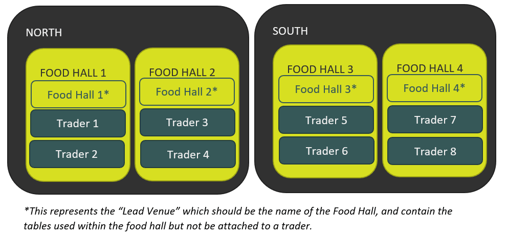
Designed for a Food Hall type set up, Multi-Venue Ordering is a specific set up of Venues and use of Online Ordering. You will also need to ensure that the settings are correct in the Online Ordering: Integration Settings page first.
When operating a Food Hall style configuration:
- Each Food Hall will need to be represented by one Area
- That Area will need one Venue that also represents the Food Hall, with the opening hours and tables for the venue. The "Lead Venue" also needs to be "Available on Loyalty Site" within venue settings. This venue shouldn't be used by a trader. This is defined by pressing Actions in the Area.
If you wish to operate under an MVO setting please contact your Professional Services Manager, Account Manager or the Support Help Desk. There are other relevant settings to ensure are correct for MVO:
Venue Management
Venues are created and managed on the Administration > Venue Settings page.

- Add a venue - this will take you to the Venue Settings page for a new venue. Please don't forget to contact us if you are in the process of acquiring a new venue.
- EPoS Simulator - this allows you to view any changes in a training online version of the EPoS for that venue.
- Price Bands - this is a shortcut to managing that venue's price bands.
- Settings - this is the main page to edit the settings of the venues, see below.
- Bin - this will remove the venue, see below.
The Head Office venue is present in every account and cannot be ended or deleted.
Venue Settings
Click on the Venue Settings tab for the venue you require or choose Add a Venue.

- Details - This is where you record basic information such as an address, contact information, and the Venue Manager. The information must be accurate as it is available on customer-facing aspects such as EPOS receipts, and various CIC pages.
- Sales & Marketing - This tab allows you to personalise your receipts, EPOS screen, toggle between active menus, and various other settings such as how receipts, dockets and tabs behave, Online ordering integrations, and customer-facing screens.This tab is also where you can toggle skip order payment confirmation.
- Financial Settings - As you'd expect, you include your VAT number, bonus accrual, cash safe par level, and nominal coding for financial integrations. If you check EPoS Session Credit Control, your team will be prevented from closing till sessions in this venue when there are tabs with outstanding credit open. When selected, it will then mean that all tabs will have to be settled before the till session can be closed and closing tasks can be carried out.

- Tills - these are your hardware settings for regular tills and iPad tills.
- Preparation - these are your hardware settings for printers and KDS stations.
- Printer Rules - this is where you can set rules for printing your work dockets.
- PDQs - These are your PDQ hardware settings.
- Tables - This section is essential for 'at table' ordering via the CIC, and if you use certain functions within EPoS. You can create areas and then tables within them. You can set the capacity of each table, and whether that table should be available on the CIC (ie. public-facing).
- Tools - This section allows you to manage Ingredient restrictions on masse for that particular venue.
- Timings - This tab will allow you to define your operational times. Specifically, your operational start hour (currently mentioned above in a separate tab), Service Timings (used for various reporting and analysis functions), and your Opening Times (for online ordering purposes). Note that you can name your Service Times in Kobas System Preferences.
Operational Start Hour - this is important and is the hour you wish your "day" to start. By default, this is 6 am (06:00). This means that sales taken 06:00 on Monday to 05:59 Tuesday will actually be recorded as Monday's sales. This allows you to record sales past midnight on the "day of business".
- Online Ordering - please see our Online Ordering article for this.
Ending and deleting venues
When you no longer operate a venue that is hosted in your Kobas account, there are certain steps and considerations required to be completed. Some of these will need to be completed in order.
Warning: A further reminder that any changes you make within these settings will not effect your Billing. Please discuss any changes necessary to your account with your Account Manager, your Sales Team contact or our Support Help Desk.
"Ending" the venue
This is completed within the Administration > Venues > Venue Settings page.

This can be completed with anyone with Administration permissions within your account, and can also be undone on the same page. This will have the following effects:
- You will no longer be able to complete any further Daily Tasks, or edit current ones. You will however be able to see logs of those completed.
- You will no longer be able to create a new rota, but will be able to see historic rotas and hours worked.
- You will not be able to create new Orders, Deliveries or Stock Checks. You will be able to see historical checks and stock usage.
- Staff members will not be affected, nor will their contributions within Collaboration. However, those whose Home Venue as ended will show as N/A home venue.
- Customers can no longer choose ended venues as Interested Venues.
- Reports will still show data from Ended venues.
- The ended venue will no longer appear on your CIC. Gift Cards that were only redeemable at that venue will no longer be available to purchase on your CIC.
- Job Applications that are specific to the ended venue will still be live but show no venue, and will need hiding or deleting.
- Scheduled email reports will not be affected and contact will need to be made to our Support Help Desk should these need to stop being sent for an ended/deleted venue.
"Deleting" the venue
Warning: We do not recommend deleting venues, please speak with your Kobas contact prior to undertaking this action. There is likely to be a charge to restore a deleted venue incorrectly.
This is completed by pressing the Bin icon within Administration > Venues:

This can be completed with anyone with Administration permissions within your account, and cannot be undone. The system will prompt you to undertake these actions before deletion:
- Remove all tills associated with the venue
- Move or end all staff profiles with the venue as their home venue
- Ensure than an End Date (above) has been added.
Deleting a venue will have the following effects, in addition to those above for "Ending" the venue:
- You will still be able to see Daily Tasks completed historically, but not filter for them.
- You will still be able to see Hours Worked by individual staff in the deleted venue, but not the complete rota or costings for that venue.
- You will be able to see deliveries and stock checks for the venue from the list view but not filter for them.
- EPoS Items that were only "available in" the deleted venue, will change venue.
- All reservation records for the deleted venue will no longer be visible, including where pre-payments had been taken for future events.
- No reporting data will be available, except where relating to staff.
- Gift Cards that were only available to the deleted venue will now no longer be available for purchase in the CIC.
Note: Kobas structure requires each client to have a Head Office venue in cloud. Therefore you always have to have a venue where the "Head Office" tick box is selected.