Who can use this feature:
🥇Accounts on the Starters, Mains or All You Can Eat plan, with "KDS" add on.
🔐Users with access to the Administration, EPoS Administration permission.
Jump to:
- Stage One: KDS States
- Stage Two: Venue Settings
- Stage Three: KDS Build Creator
- Stage Four: KDS Station Views/Options
Read an introduction to KDS here before you attempt to configure your KDS system. You may also wish to review permission levels relating to KDS here.
Stage One: KDS States
You can customise the KDS States within your account by going to In-Venue > KDS States where you can add, remove, rename and reorder each state, as well as change colour.

Top Tip: Be mindful that choosing a background colour that blends to the background such as black will result in difficulties reading the orders. Similarly, make sure that your text colour is readable on the background colour.
Queued and Ready are mandatory as they link with other parts of the system, such as Order Management.
Stage Two: Venue Settings
Navigate to Administration > Venue Settings > Settings > Preparation where you'll see a list of existing Printers and KDS Stations.
In order to add additional KDS Stations in your account, you will need to contact the Support Help Desk.

You will need to toggle the Process KDS Orders on when you are ready to use KDS. If you leave this on prior to using KDS, all of your orders will require to be completed on the KDS systems when you do go live.
You will have two choices for KDS Bump Bar layout, make sure you select the correct option.
The properties of the KDS Station are:
- Name - This is used when switching screens and assigning to EPoS Items
- Model - This refers to the physical screen unit that you are using
- IP Address - Add the IP address of the unit (if using a physical device).
Top Tip: For tablets we would recommend creating an entry in the Tills and Preparation page with the same IP address. This allows you to have both app's on the tablet, and your serving staff can switch between the EPoS and KDS view.
- States to be shown at this station - This is dependent on how your kitchen or bar will operate. It could be that you only need the screens on the pass and waiting station to have all states, and the screens on deli, starters, and cook-lines only need prep/cooking, for example.
Top Tip: This setting is the backstop setting whereby if a state isn't selected here for a particular screen, that screen can not view those states. However, for the states that are ticked here, the user can choose to filter the states on the KDS screen.
This allows your kitchen to adapt to busy and quieter periods. By allowing all of your kitchen stations to see all states here, they can filter on the station on the shift depending on how many staff are working.
You may wish to separate Kitchen and Bar states out using these settings.
- Can Bump / Recall / Remake - These checkboxes give that station the ability to complete these actions (see definitions above). Can Remake also make the Remake & Waste option available.
- Can Print - This will print an order summary including allergen information. Great for a takeaway/delivery hand-off point.
Counters can be assigned to a KDS station in this view. You can choose up to four ingredients or batches for that station to display the total of how many are required for current orders.
Top Tip: Ingredients and Batches set in the Counters section will show their main 'Name' on this page, but on the KDS screen itself will use their 'Display Name'.

Using an iPad as a KDS Station: This is an affordable and flexible addition to your KDS system. Please visit our iPad article to correctly configure your iPad for use as a KDS Station. Do not hesitate to contact our Support Help Desk should you require.
Stage Three: KDS Build Creator
Once you have your KDS stations set up correctly, you'll need to define the builds and routes that EPoS Items will take through your KDS system.
You can see at a glance which EPoS Items have a Build defined from the In-Venue > EPoS Items (PLU) page:

To assign a build, you'll need to go to Edit > KDS Builds.
Create Build Items for each EPoS Item:
This gives you the ability to break down the EPoS Item into separate "builds". You'll need to add which ingredients, batches and Modifier answers are associated with each build (part of the process).

- Once selected, the recipe items and Modifiers will be displayed.
- You need to mark one as default build.
- Where the answer to a Modifier is required in different builds, you can ungroup the answers and drag them independently into different builds.
- The checkbox Always Show means that this build will show even when no recipe or Modifierare included.
- If you just use a Default Build and don't separate out into child builds, then the KDS system will only display the EPoS Item as a whole.
Be aware: If you get to Build Manager through an individual EPoS Item, you will only be able to edit that EPoS Item. You will need to save and exit the Build Manager.
You will then need to apply the build to all venues, or complete the same process on each venue tab to create unique build routes per venue.
Defining builds in bulk:
By going to In-Venue > KDS Builds, you can assign builds in bulk. By selecting multiple EPoS Items, the ingredients, batches and Modifiers in common will be able to be assigned to a specific build, with all unique elements remaining in the Default Build.
EPoS Items and Modifiers which are not used across multiple recipes will be greyed out and automatically assigned to the Default Build.
Top Tip: For simple setups, such as a one-station bar, you can add all drink items using the Bulk Build Manager. Tick to Always Show on the Default Build.
Assign build Items to KDS Stations:
Then you will need to define which routes the item takes through your Kitchen or Bar, using the appropriate venue tab.

If your venues have the same KDS screen layouts, then we would suggest simply using the Default (All) tab. This will then automatically apply to all venues. If you have venues that have different KDS screen configurations, you are likely to need different routing per venue. In this instance, after setting a Default route, then you go to the venue tab, check the "Unique Build" tickbox, and Enable/Disable the builds to specific screens as required.
Press Disabled to enable that item to pass through this screen. Pressing Enable will then toggle it to disabled. Press Save to make changes, you can then edit the stations in another venue.
Top Tip: If you are using KDS for food and drink orders, this is where you dictate which items go to the Kitchen screens and which to the Bar. Furthermore, which parts of the kitchen and which sections of the bar.
Stage Four: KDS Station settings
There are several settings that can be customised on the KDS screen itself, by pressing the Settings button in the top right-hand corner.
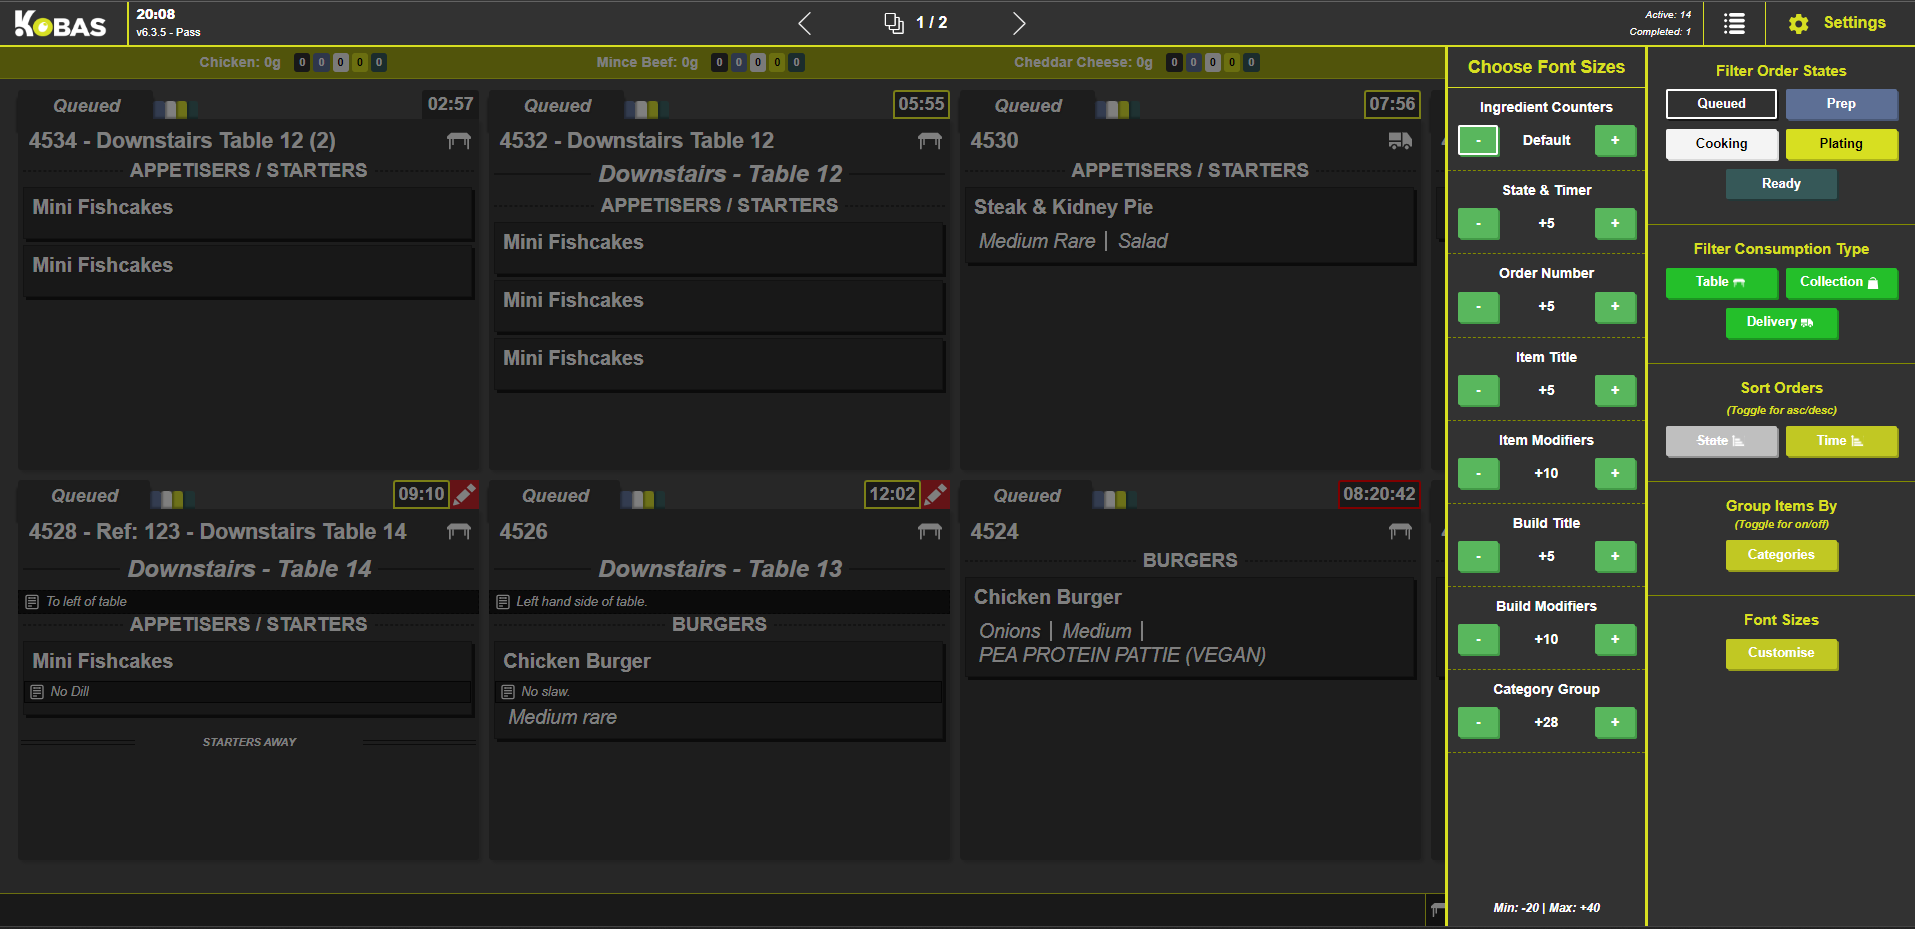
- Grouping by Categories (courses): This will toggle on/off seeing the items in each order split by category. This is intended to be used for courses Starters, Mains etc.
- Filter by Order State or Consumption Mode: This allows you to display only certain states or consumption mode orders on this particular screen.
- Sort by State or Time: This dictates in what order the Orders will be displayed on your screen.
- Custom font sizes: You can change the font sizes for each different part of the screen views.
KDS Source Suppression
This function allows you to decide which orders are going to a specific KDS Station. These settings are added on the screen of each station. You are able to stop (suppress) the following groups of orders from coming to your station:
- By Till
- By CIC Table Area
- By Integration (such as Delivery and Preoday)
For each of the above, you can then suppress further by:
- Category
The suppression menu is selected by the first of the options on the top right of the KDS Station:

Follow the instructions on screen from that stage to save the correct suppressions.
Identical Item Counts
For kitchens where several of the same item can be ordered, you can optionally toggle a count for identical items. This can be added by pressing settings on your KDS station and toggling the bottom option.
You will then see an x of y counter on the identical items. This quickly allows you to see how many of the same item has been ordered, but still individually bump them along the flow.

Read our guide on how to use KDS in your kitchen or bar here.