Who can use this feature:
🥇Accounts on the Starters as an add-on, on Mains (if this is a chosen included feature) or All You Can Eat.
🔐Users with access to Staff > Employment Documents Settings.
Jump to:
- Introduction
- Configuration
- Employment Documents
- Viewing Documents at a glance
- Creating a new document
- Published documents
- Uploading a document
- Signatures and Read Receipts
- Archiving Documents
Introduction
Our Employment Document feature enables you to fully manage contracts, training and company policy documentation, and centralise compliance records in one system.
This makes it easier than ever for your team to create documents for policies and agreements, send them to your staff for e-signatures or read receipts and log it all in one system.
This can be found in Kobas Cloud by navigating to Teams > Employment Documents.
Below is a preview of what Employment Documents is capable of:
Kobas Definitions
- Agreement - Actions requested from a staff member on a document fall into three categories:
- Read only - The staff member confirms they have read the document.
- Sign and read - The staff member signs the document, making it legally binding.
- No agreement - No staff action is required.
- Document status - Documents move through three possible states:
- Draft - The document content is still editable and not yet available for staff to action.
- Published - The document is visible in the staff member’s profile under the Documents tab and ready to be reviewed.
- Archived - The document is no longer available for staff to action.
- Document Version - Documents created in Kobas Cloud can be edited multiple times, generating new versions as needed.
- Staff Selector - The popup tool for selecting which staff members will receive the document.
-
Document Type - Categories defined by use case, expandable as required:
- Contract
- Policy
- Training Materials
- Appraisal/Review
- Placeholders - Personalise documents with placeholders that automatically pull information from staff profiles. Learn more about placeholders here.
Configuration
Staff User Permission Levels (SUPLs)
This feature will be active in your account, and cannot be turned on and off.
In order to access the product, each Kobas cloud user will have Employment Document permissions based on the user group they're in.
Note: All staff can access their own documents regardless of their Employment Document Permission level, as long as they are able to access their Staff Profile. We are continuing to develop and improve this access.
Staff profiles will only be visible to users with the correct permission level to see them. No user will be able to see the profile of a staff member on the same seniority level as them, or higher. Staff will not be able to see the full detail in their own profile, Administrators are the exception here who can see and edit their own profile.
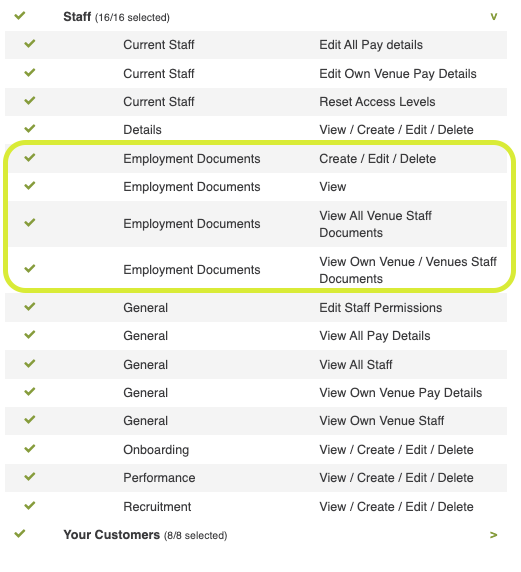
We have permission levels for Employment Documents:
- Create / Edit / Archive
- Ability to Create Document
- Access to Edit Document / create new versions
- Ability to Archive Documents
- View
- Access to Landing page
- View All Venue Staff Documents
- Ability to View all Staffs document tabs via staff profile is of profiles with a lower access level than yourself.
- View Own Venue / Venues Staff Documents
- Ability to View Own Venue Staffs document tabs via staff profile is of profiles with a lower access level than yourself.
Note: Please be aware that these permissions also have the "All Venue" or "Own Venue" element, which exists throughout the permission-level structure. Find more information here.
Email Notifications
Emails will be sent to the address listed in each staff member’s profile for the following events:
- When a document has been published.
- When they have been added to a document.
- Weekly email if they have outstanding documents to action.
- When Remind Staff button is clicked on the document or on the staff profile
Warning: Emails will not be received if a staff member's email is incorrectly entered into their staff profile.
Each email will contain a link to the log into Kobas Cloud, which can be accessed when logged in.
Employment Documents
You can create new documents, view and filter your documents, complete actions, and view document details.
View and Filter Documents
- In your Kobas Cloud account, navigate to Teams > Employment Documents.
- Quickly view your documents by State using the tabs:
- Draft - All draft documents and their versions
- Published - All published documents
- Archived - All archived documents
- To use a filter, click the dropdown menus above the table and select filter criteria. Filters available:
- Completed?
- Complete – all documents where every selected staff member has completed the required action.
- Incomplete – all documents with outstanding actions awaiting staff completion.
- Published date – The date the document was made available to staff.
- Published by – The team member who published the document.
- Created date – The date the document was initially created.
- Document type – The category assigned to the document.
- Agreement type – The required staff action, Sign and Read or Read only.
- Completed?
- To clear filters, click the Clear Filter button.
- In the Document table, use the search bar to locate a specific document by entering its title.
Navigation and Actions
Within the documents table, you can complete actions and view document insights and details. This table has been designed to give you a breakdown of your documents at a glance. Allowing you to see at a glance which documents have been actioned by your staff members.
When hovering over a document, the action button appears, each state has their won actions availabe:
- Draft:
- Edit - Access the edit page to update the document. Learn more about editing documents here.
-
- Preview - Open a preview of the document in a new tab.
- Download copy - Download a PDF version of the document.
- Published:
- View details - Open the document details page to review its contents. Learn more about viewing document details here.
- Edit - Access the edit page to update the document. Learn more about editing documents here.
- Preview - Open a preview of the document in a new tab.
- Download copy - Download a PDF version of the document.
- Archive - Once archived, the document can no longer be agreed by staff members.
- Archived
- View details - Open the details document page for the document, read more about viewing document details here
- Preview - Open a preview of the document in a new tab.
- Download copy - Download a PDF version of the document.
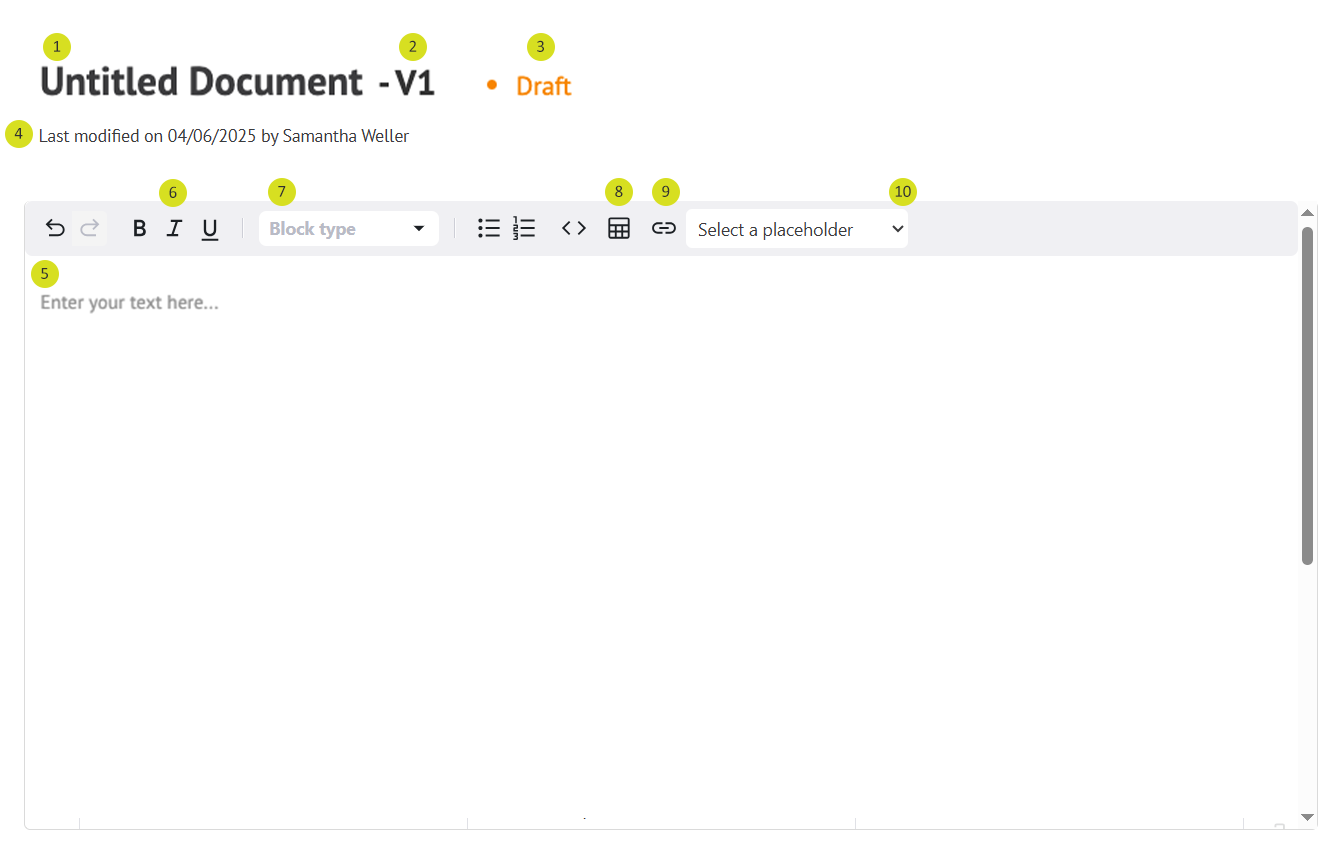
Create a new document
- In your Kobas Cloud account, navigate to Teams > Employment Documents.
- Click Create New Document.
- In the top left, edit the documents title.
- Version number, allows you to see what state of the document you are viewing this will increase with each new version of the document
- Status indicator, shows the current status of the document you are viewing.
- Last modified shows that date the document was last updated and by who.
- Click into the large box on the left, this is the content editor where you create your documents.
- Use the formatting options at the top of the content editor to modify the text.
- The change the size, select the Headings dropdown menu and change the heading.
- To add a table, click the table icon.
- To add hyperlink text, click the link icon.
- To include Placeholders in your content, click the Select Placeholders dropdown menu. Learn more about adding personalised placeholders to employment documents.
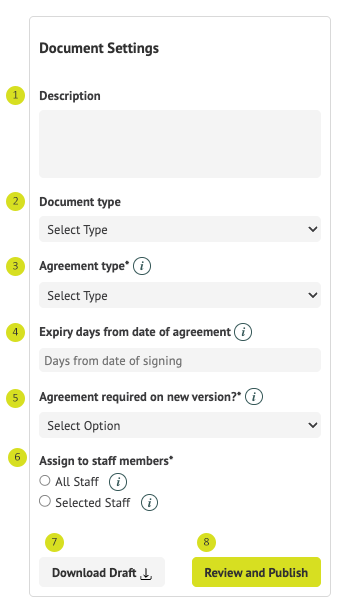
Create Document Settings
In the left panel, edit your document settings
- Description - Allows you to describe what the document is, who it is meant for, why was it created, how of
- Document type - Helps you organise your documents
- Agreement type - Choose how staff should interact with the document:
- Sign and read - Requires a signature to confirm agreement or consent (e.g. policies, contracts).
- Read only - Tracks that the document was opened, not signed (e.g. training, internal notices).
- Not required - No action needed. The document is saved to the staff member’s confirmed documents. Ideal for uploading signed copies.
-
Expiry days from date of agreement - Number of days after signing when staff will be asked to agree again.
- Agreement required on new version - Require staff to re-agree when a new version of the document is published.
- Assign to staff members -
- All Staff - All staff members will receive this document upon publication. It will also be sent automatically to any new staff who join afterward.
- Selected Staff - Using the pop up staff selector, you can select members will receive the document upon publication only. New staff will not be added automatically.
- Download Draft - Download a PDF copy of the document, allowing you to send a copy off for approval if they do not have access to Kobas, for example external HR or Legal departments
- Review and Publish - Take a last look at your documents settings, when published, the document will be added to the selected staff members staff profiles > Documents tab to be actioned. If there is no agreement needed, the document will appear in the staff members profile > Documents tabs > Confirmed Documents section
Saving and Drafts
Your documents are automatically saved whenever you make a change, so your work is always secure. To exit and return to your documents, click Save and Exit in the footer.
Using Placeholders
When creating a document using our Employment Document creator, you can add personalised placeholders into your documents. These placeholders use the assigned staff members information stored on their Staff Profile to create documents tailored to them.
Placeholders are not available for uploaded documents.
Adding personalised placeholders
When editing draft documents, here is how you insert placeholders:
- In the formatting bar, click the Select Placeholders dropdown menu
- Select a placeholder to insert from the list
- Placeholders available:
- First name
- Surname
- Full Name
- Address
- DOB
- Telephone
- Mobile
- Company Name (legal)
- Company Address
- Company Number
- Start Date
- Job Title
- Contract Type
- Pay Rate
- Pay Type (hourly / salary)
- Notice Period
- Placeholders available:
- Once published, the document will be unique for each staff members assigned
If there are placeholders missing you would like adding to the Employment Documents content creator, please email support@kobas.co.uk
Updating staff details when using placeholders
If a document contains incorrect staff information (e.g., name, job title, or start date), you can correct this by updating the relevant fields on the staff member’s profile.
-
Before the document is agreed:
If the document is still in a pending state (i.e., not signed or read), any updates made to the staff profile will automatically update the placeholders in the document. -
After the document is agreed:
Once a document has been confirmed, the placeholder values become fixed. Subsequent changes to the staff profile will not update the agreed document.
Reissuing a document with updated Information
To provide an updated version of a document with corrected information, you have two options:
-
Create a new version of the existing document
-
Ensure the setting “Agreement required on new version” is enabled.
- Be aware - all other members of staff assigned to the document will also be receive a new version to confirm
-
-
Create a new document
-
Use the updated placeholders to generate a fresh document.
-
This ensures that the recipient receives the most accurate and up-to-date information.
Published Documents
When a document is published, staff will receive an email notification prompting them to take action. The new document will appear in their Staff Profile under the Documents tab. Learn more about actioning documents, reviewing confirmed records, and downloading your documents.
- Document Title - Name of the document.
- Version Number - Current version of the document.
- Document State - Indicates whether the document is in draft, published, or archived status.
- Remind Staff - Sends a reminder email to all staff who have not yet actioned the document.
- View - Preview the document in a new tab
- Download Copy - Download a PDF version of the document
- Edit Document - Update the document title, settings or create a new version
- Version History - View or download previous versions of the document
- Archive - Archive the document. Read more about archived documents here

Staff table
This table displays which staff members have been assigned the document for action. If the table is blank, no staff have been selected.
- Filter bar - Use these filters to narrow the table view.
- Clear Filters - Remove all applied filters from the table.
- Search - Enter a name or email address to quickly locate a staff member.
- Export - Download a CSV file of all assigned staff.
- Add Staff - Add or remove staff from the assignment list.
Editing documents and version control
When creating documents within Employment Documents, you have the flexibility to make multiple revisions, update the content, and reissue documents as needed.
To edit a draft document:
- Go to Teams > Employment Documents.
- Find the document you want to edit.
- Hover over the document title.
- Select Actions.
- Click Edit.
- The edit page will appear, allowing you to make changes to your document.
To edit a published document you can do this two methods, the first being:
- Go to Teams > Employment Documents.
- Find the document you want to edit.
- Hover over the document title.
- Select Actions.
- Click View Details.
- Click Edit Document.
- The edit page will appear, allowing you to make changes to your document.
Or
- Go to Teams > Employment Documents.
- Find the document you want to edit.
- Hover over the document title.
- Select Actions.
- Click Edit.
- The edit page will appear, allowing you to make changes to your document.
Uploading a document
Before you begin, be aware of the following restrictions when uploading documents
- Files need to be Portable Document Format (pdf)
- Max file size is 25mb
- Unable to create new versions
- No content editing options, including Placeholders
- In your Kobas Cloud account, navigate to Teams > Employment Documents.
- Click Upload New Document.
- File explorer window opens, select file and click open
- Pop up appears with message to say upload was successful, click okay
Upload Document Settings
In the left panel, edit your document settings
- Description - Allows you to describe what the document is, who it is meant for, why was it created, how of
- Document type - Helps you organise your documents
- Agreement type - Choose how staff should interact with the document:
- Sign and read - Requires a signature to confirm agreement or consent (e.g. policies, contracts).
- Read only - Tracks that the document was opened, not signed (e.g. training, internal notices).
- Not required - No action needed. The document is saved to the staff member’s confirmed documents. Ideal for uploading signed copies.
-
Expiry days from date of agreement - Number of days after signing when staff will be asked to agree again.
- Assign to staff members -
- All Staff - All staff members will receive this document upon publication. It will also be sent automatically to any new staff who join afterward.
- Selected Staff - Using the pop up staff selector, you can select members will receive the document upon publication only. New staff will not be added automatically.
- Download Draft - Download a PDF copy of the document, allowing you to send a copy off for approval if they do not have access to Kobas, for example external HR or Legal departments
- Review and Publish - Take a last look at your documents settings, when published, the document will be added to the selected staff members staff profiles > Documents tab to be actioned. If there is no agreement needed, the document will appear in the staff members profile > Documents tabs > Confirmed Documents section
Document Signatures and Read Receipts
Note: All staff can access their own documents regardless of their Employment Document Permission level, as long as they are able to access their Staff Profile. We are continuing to develop and improve this access.
Staff profiles will only be visible to users with the correct permission level to see them. No user will be able to see the profile of a staff member on the same seniority level as them, or higher. Staff will not be able to see the full detail in their own profile, Administrators are the exception here who can see and edit their own profile.
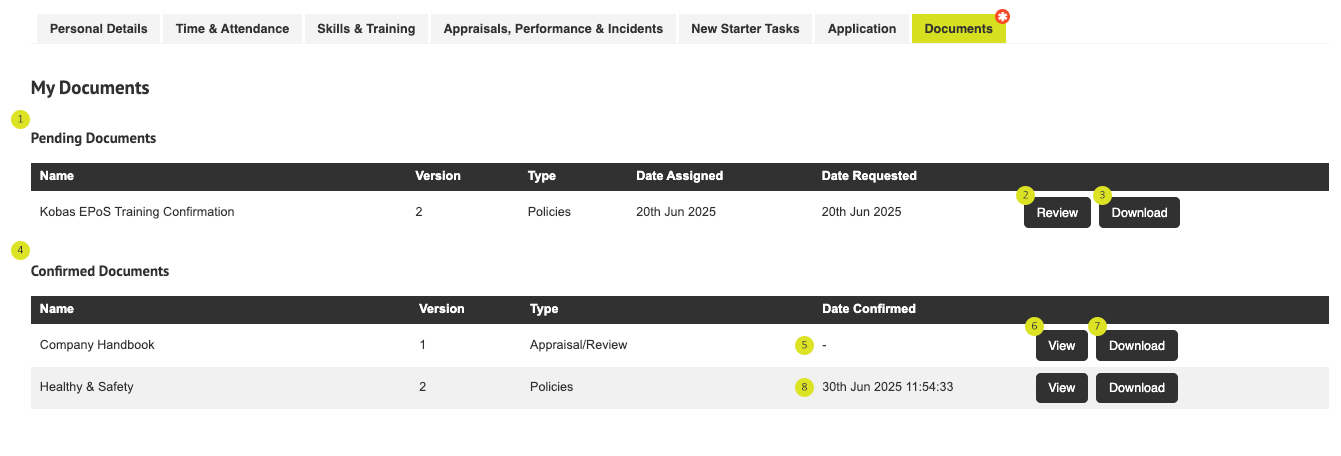
- Pending documents - Lists all documents awaiting action.
- Review - Opens the document in a new window, allowing you to review and accept.
- Download - Download a PDF copy of the document for review.
- Confirmed documents - Lists all documents that have been agreed to, as well as those where no agreement was required.
- Blank confirmed date - If the confirmed date is blank, the document did not require any agreement.
- Confirmed date and time - Shows when the document was agreed and signed, confirming its legal status.
- Download - Download a PDF copy of the document with the staff name, date, and timestamp included for your records.
How to sign a document
- Log into Kobas Cloud
- Head to Teams > Current Staff
- Hover over on your name and click View Details
- Click the Documents tab
- Under Pending Documents, download a copy of the documents to review
- To agree a document, click Review
- In a new window, review the full document
- At the end of the documents, click the tick box and press Submit
View and download confirmed documents
When a document is agreed, or a document agreement is not required, the document is stored in the Staff Profile. Follow these steps view and download the confirmed document:
- Log into Kobas Cloud
- Head to Teams > Current Staff
- Hover over on your name and click View Details
- Click the Documents tab
- Under Confirmed Documents
- Click View to open in a new window
- Click Download to save a copy with a date and time stamp
With the appropriate Staff User Permission Levels, managers can download confirmed documents another staff member's Staff Profile for record keeping.
Archiving Documents
Once a document is archived, it cannot be restored or edited, and new versions cannot be created.
When a document is archived, it will no longer be visible in staff profiles. Managers with the appropriate SUPLs can still view which staff members agreed to the document prior to archiving and export records for reference.