Online Ordering for your customers
This article looks at how to configure Online Ordering through your Kobas system, for at table ordering, collection or delivery.
Jump to:
- Introduction
- Initial set up
- Venue settings
- Sales & Marketing tab
- Online Ordering tab
- Timings tab
- Tables tab (inc QR Codes)
- Notes:
Introduction
Most food and beverage experiences now allow customers to order online at their table or in advance for collection or delivery. This article explores how you can use your Kobas CIC for Online Ordering. You will need to have already set up your CIC.
Please see our specific guides for processing Online Ordering using our partner integrations:
The Online Ordering section of your CIC will show all EPoS Item's active on that venue's current EPoS menu, that are "public facing". You can also restrict items or categories based on time and day (ie. Sunday Roasts only on Sunday's) and items marked "Sold Out" will say the same on the CIC.
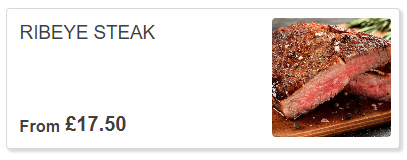
Items will show in their EPoS Item Category (though multiple categories can be merged), and will show name, picture, description and allergen/nutritional information. Items with Modifiers that change the price will show on the CIC with the price as "from". All of these settings come from the main EPoS Item setting, and you do not need to make any specific changes for Online Ordering.
Receipts for all orders are emailed to customers.

Order flow
This table explains how the states are mapped between the CIC Mobile Ordering (what your customers will see), EPoS Order Management (on your tills) and KDS States (if applicable).
| CIC Mobile Ordering | EPoS Order Management | KDS States | |
| 1 | Awaiting confirmation | Pending | N/A |
| Cancelled / Rejected | Cancelled / Rejected | N/A | |
| 2 | Confirmed / Preparing | Preparation | First available state |
| 3 | Ready | Ready | Last available state |
| 4 | Dispatched | Dispatched | Bumped to complete |
Warning: Due to regulatory and legal compliance, there may be a few occasions where your customer doesn't receive the email and within Kobas still shows as "Pending". Read here to find out more and how this can be resolved.
Initial set up
The first step is to ensure that your Customer Interaction Centre has been set up by Kobas engineers.
Your configuration of the CIC should follow this.
Venue settings
You must then head to Administration > Venue Settings > Settings for the relevant venue.
Sales & Marketing tab
Make sure that your venue is included on your CIC by ticking the "Include Venue On Customer Loyalty Site" checkbox.
Online Ordering tab
General settings:
- Gratuity Prompt Settings
Payment settings:
- Stripe Account: For clients with a single Stripe account, this will automatically populate with the default option. For those clients with multiple accounts, this can be selected here.
- Accept Tips: Turning this on will allow customers to leave a tip at the checkout.
- Percentage Options: These options offer customers quick-click options to apply a set tip percentage. Note that customers can still apply their own tip amount.
- Admin Fee: This allows you to nominate an EPoS Item to be applied as an Admin Fee for using online ordering. We would suggest this EPoS Item shouldn't be public facing so it doesn't appear on your menu.
Note: For MVO operators, this can only be applied to the Lead Venue. The EPoS item to be used as "Admin Fee" will need to be available in all consumption modes.
Consumption mode-specific settings:
- Consumption Mode Available: This dictates whether that consumption mode is available on your mobile ordering at this venue or not.
Warning: If you select a Consumption Mode you will need to ensure you have opening hours at that venue otherwise the venue will fail to load for your customers.
- Order Approval Timeout: The length of time that an order can wait for approval before the order will be automatically rejected and payment refunded.
- Accept Tips: This option allows you to hide the tip screen on checkout when a certain consumption mode is selected.
- Estimated Service/Collection/Delivery Time: The number of minutes that an order is expected to take until fulfilment. This will be added to the approval time and communicated to the customer.
- Order Ahead: This option when ticked allows customers to order for collection or delivery in advance, for the same day. Once selected, a further option will appear "Order Ahead Time Intervals", allowing you to dictate the slots that orders can be made in.
Additional delivery options
- Maximum Delivery Distance: Customers are prompted for their post code. If the customer’s address is beyond the venue’s maximum delivery distance, orders cannot be placed.
- Minimum Order Value: The minimum basket total a customer must reach before an order can be placed.
- Delivery Fee: When enabled, a PLU will be assigned as a “Delivery Fee” for accurate payment processing on EPoS.
- Delivery PLU: The PLU selected will be added to any applicable order. This will be shown to the customer as a “Delivery Fee”. The PLU must have a price in the Delivery consumption mode. The PLU does not need to be on a venue’s EPoS menu.
- Minimum Fee Required for Free Delivery: Any order greater than or equal to this figure will have the delivery fee removed.
Timings tab
Once you have enabled a consumption mode in the Online Ordering tab, you can set the available times for online ordering in that consumption modes. One open and closing time (in the 24-hour clock format of HH:MM) can be added for each consumption time. If you have different opening hours on each day, you can check "Variable Opening Times" and then define times for each day of the week.
Top Tip: You can dictate which EPoS Items are available when online using various tools within your account.
Tables tab
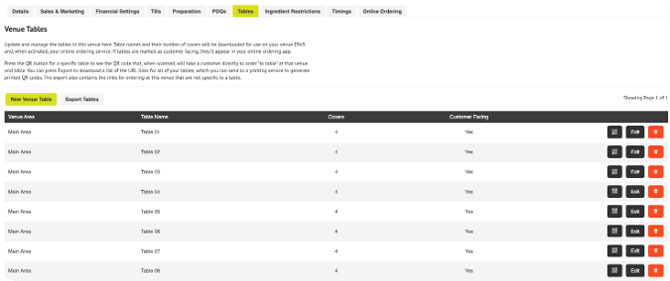
This tab allows you to create and name your tables, and group them into areas. These tables are used for online ordering and are on your EPoS. Once active, this allows your staff on EPoS or you customers in the CIC, to attribute each order to a table. This is then printed on the work docket so that your staff and bring the items to the correct table.
Hungry customers want quick access to their food and drink! Using QR codes is the quickest way your customers can access aspects of your CIC.
You can generate QR codes for these areas of the CIC by copying your web address into an online QR Code Generator.

You can find URLs which take your customers directly to your online ordering and directly to tables. This file can be sent to a printing company to produce table QR codes.
Warning: If you delete tables, the QR code will no longer work. If you create a new table with the same name, the table will have a different QR code. You may wish to consider making the table unavailable to your customers by pressing Edit and unchecking the Customer Facing option.
Notes
Multi-Venue Ordering (MVO)
For venues that are set up as traders/venues within an MVO setting, such as a Food Hall, you'll notice a further setting on this screen. This is where you can upload the Venue Logo which customers will see in the Venue Splash Screen when selecting venues to order from.
If you wish to operate under an MVO setting please contact your Implementation Co-ordinator, Account Manager or the Support Help Desk. There are other relevant settings to ensure are correct for MVO in the Integration Settings and Venue Territories.
"Category Splash Screen" and EPoS Category set up
The Category Splash Screen ensures that your mobile ordering element of the CIC is as easy to navigate as possible. Once completed, your ordering portal will look like this:
To set this up, you will need to add an image to each of your EPoS Item Categories by going to Administration > EPoS Item Categories.
In this screen, you can also define a public name for each of your categories which can be more customer-friendly than your internal category names.
Furthermore, you 'merge' categories in your mobile ordering (whilst still keeping them separate internally), simply by giving them the same Public Name.
You can change the order of the categories by changing the Print Order on this screen. Please bear in mind that this will also affect the order of the categories on your printed dockets in-venue.
It is also worth noting that these settings are global to your entire account, and cannot be specified per venue.
Note: The Category Splash Screen isn't available within an MVO set-up.
Apple Pay - for orders
Customers can pay using Apple Pay, but this is only accessible for most customers when they access the site using the Safari Web Browser. This is dependent on development from Apple and may change in the future.
Google Wallet - for your loyalty QR code
Adding a pass to your Google Wallet:
- Open the Google Wallet app
- Tap Add to Wallet > Photo
- Take or select a clear high-resolution photo of your QR code.
- Add a name and description for the pass.
- Tap Add
You can then use this in the usual way you would use your Google Wallet.
Zero-priced orders
Your CIC will allow your customers to process zero-priced orders. This doesn't require them to enter their details or payment information. This is perfect for customers ordering free items such as tap water or dog treats to their table, or for pre-paid or free events.
"From" price
When you have a Modifier that can change the price of an item (by adding a mixer, or additional toppings for example), then the CIC Online Ordering platform will show your customers the "from" price.

The system will work out the minimum price based on all mandatory and optional modifiers and the pricing within the EPoS item.
Email receipt logo
The logo used on email receipts for Online Orders is not automatically the same as the EPoS receipt image. You can change this by going to Administration > Kobas System Preferences > Loyalty Global > Email Logo and entering the URL where the image is stored. Please contact the Support Help Desk if you require assistance.
Further functionality:
- Take a look at the customer journey, or manage and track orders.
- Allergen and nutritional information
- Customer facing EPoS Items