Jump to:
Introduction
In your kitchen or other hot and sometimes greasy environments, a thermal printer might not be the best solution. An impact printer is more reliable because the heat won't interfere with the printing mechanism. The impact printer we resell and install as standard is the Star SP700 series, usually a Star SP742.
Manufacturer Information: It is recommended that you only use official Star ink cassette ribbons when replacing your cassette ribbon. Using third-party, cheaper options can damage the printer and void any warranty on the device.
If you need help on where to purchase new ink cassette ribbons for your Star impact printer, please email support@kobas.co.uk
During the normal operation of your business, there are likely going to be times when your SP700 needs some attention. The next section explains the various error messages shown by flashing lights on the unit, and how you can fix them.
The latter section explains how to factory reset your SP700 series, however, this is only required if you are advised by the Support Help Desk.
Note: Kobas is a software service provider and we simply act as a reseller of hardware from our preferred suppliers. Our Support Help Desk are more than happy to assist where they can in supporting you with your hardware. However, there maybe times where our teams signpost you to the manufacturer. Kobas is also not able to support with, or be responsible for, your Networking and Internet infrastructure.
Troubleshooting: Flashing lights
There are two lights, a green and a red and depending on their behaviour, you should be able to identify what is causing the printer error. The table below will run through each scenario and how to resolve the error.
| Green Light | Red Light | Issue | Actions to fix |
|---|---|---|---|
| On | Slow Flash | End of paper |
|
| On | On | Back cover open |
|
| Fast Flash | On | Front cover open |
|
| Fast Flash | Off | Print head over-heated |
|
| Slow Flash | Off | Board over-heated |
|
| On | Really Fast Flash | Cutter error |
|
| On | Super-Fast Flash | Mechanical error |
|
| On | Fast Flash | Paper jam |
|
| Slow Flash (every 2 seconds) | Slow Flash (every 2 seconds) | Network Connection Lost (Physical) |
|
| Really Fast Flash | Really Fast Flash | Network Connection Lost |
|
| Off | On or Flashing (any speed) | Non-recoverable error |
|
Troubleshooting: Paper Jam
An issue with this printer is that paper clippings from the docket cutting mechanism often collect up inside and cause a jam.
The printer indicates the jam by beeping and showing a red status light where there’s usually a green status light by the Feed button. When we interrogate the printer remotely, it reports a “Non-Recoverable Mechanical Error”. Sounds terrible.
Usually, it’s easy to resolve by taking the following steps:
- Power the printer off – disconnect both the power and network leads.
- Open the paper bay and remove the roll of paper.
- Open the ribbon bay and remove the ribbon.
- Then, with both doors open, invert the printer and shake all excess clippings into a bin.
- With an old toothbrush or similar, try to coax all paper clippings out from around the cutter and roller mechanisms. A vacuum cleaner might help too if used cautiously.

- Ensure the area circled in red is clear of debris.
- Then reassemble, refitting the ribbon and paper roll and try again.
- If the red light continues to show try disconnecting the power once or twice more and trying to press the Feed button when it is on; these printers sometimes take a while to recognise that everything is unblocked.

If this works, great! It’s worth considering adding this to a schedule of chores you perform every month or so, depending on your printer usage.
If that didn't resolve your issue, contact our Support Help Desk and let us know you’ve already followed this guide, and we’ll work out a way forward with you.
How to reset your SP700
Warning: It is always advisable to contact our Support Help Desk before undertaking any action listed here. Our Technical Team are often able to remote into your hardware and support you remotely. If you make changes to your hardware network settings before consulting Kobas, we will likely lose the ability to assist remotely.
This process is split into two sections:
Step One: Factory reset
- Turn off the printer
- Unplug the ethernet cable
- Turn on the printer and wait 20 seconds
- Use a pen to press and hold the Red button on the back of the printer
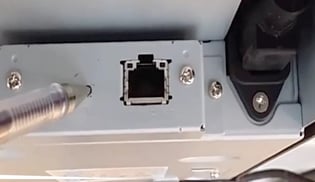
- Both red and green lights will blink simultaneously for 5 seconds

- Keep holding down the button. The red light will blink on its own for 5 seconds
- Keep holding down the button. The green light will blink on its own for 5 seconds
- When both lights begin blinking simultaneously again, release the button for 1 second
- Immediately press it again. The lights will stop blinking for 7 seconds

- The lights will then blink alternately. At this point, release the button

- Turn the printer off
Step Two: Entering new settings
- Hold the "feed" button on the front panel whilst it is off, then power the printer on via the power switch. Release immediately after you hear one beep.
- At the bottom of the second printed page you will see "IP Address xxx.xxx.xxx.xxx (DHCP)"
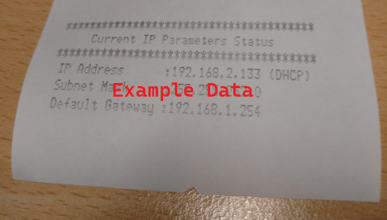
- Open a web browser on your device (that is connected to the same network as the printer) and enter the DHCP IP from the printout in the address bar and press enter.

- On the configuration page that appears, click Login from the left menu and you will be prompted for a username (root) and password (public).
- Click on IP Parameters.
- Check the Static option and enter:
- Press Submit.
- You will see confirmation of the details and success of the settings change.
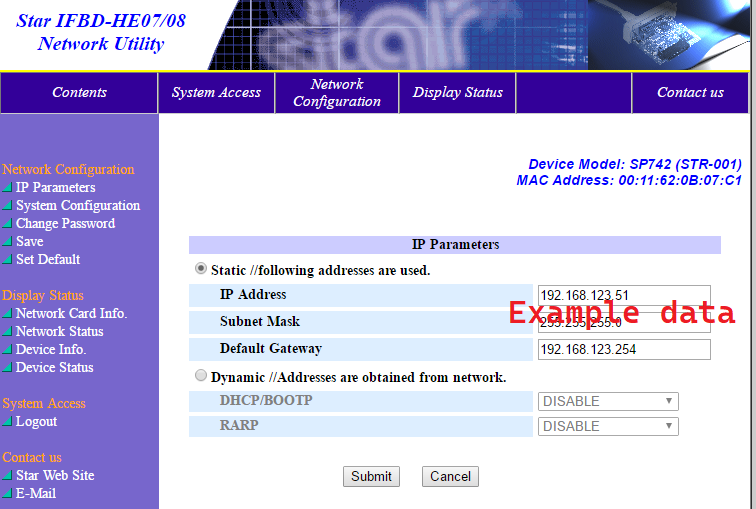
- Select Save from the left menu leaving Save → Configuration printing → Restart device ticked then press Execute.
- The printer will print 1 page with the new IP settings. Visually verify they are correct.
If you require any support during this process do not hesitate to contact the Support Help Desk.