Who can use this feature:![]() All accounts.
All accounts.![]() Users with access to Hardware settings.
Users with access to Hardware settings.
Jump to:
- Introduction
- Adding a new printer
- What can you print?
- Receipt settings
- Where and when receipts print
- How receipts look
- Receipt settings
-
-
- Where to find receipts
- Docket settings
- Define by EPoS Item or Category
- Printing Rules
-
- Troubleshooting
Introduction
Printers. One of the most important, pieces of hardware in your venue. If configured correctly, printers can really increase the productivity and efficiency of your venue.
We provide two different types of printers:
- Thermal printers are fast and quiet, suitable for bar areas and for receipt printing
- Impact printers are quite loud, but also have the ability to print in multiple colours and utilise 2-3 ply paper, more suited to kitchen areas.
When it comes to setting up your printers, you should think about:
- Their location (must be close to a network Ethernet port and power),
- Their use: for receipts (from which tills), dockets (for what items), kitchen instructions
In order to access the settings in this article, you will need to have the permissions:
- Administration > Venues (Manage), and
- Administration > Hardware Management (Manage).

Adding a New Printer
Before we look at settings, you will need to add the printer to your Kobas account by going to Administration > Venue Settings > Settings, and selecting the Preparation tab. Click on New Venue Printer, and you will see this popup:

Give your printer a Name and Description. We advise naming printers according to their location, for example, Kitchen Printer, Bar Printer 1, Bar Printer 2, etc.
Printers provided by Kobas are “Controlled by Server” – select the printer make and model in the Printer Type dropdown, and add the assigned IP address. If you are unsure of the IP address, contact the Support Help Desk. We no longer support USB printers that are "Controlled by Till".
You can select these options – hovering over the “i” symbol shows more information on these:
| Accepts Kitchen Instructions |
When any kitchen instruction (ie. "mains away) is pressed on any tab, they will print on all printers in the venue where this option is selected. Note: if you don't have any printers that accept kitchen instructions, the button to send Kitchen Instructions on tabs will be unavailable. |
| Print Duplicate Work Docket | Where the printer is used to print work dockets (see below), with this option selected, the printer will print two identical dockets. |
| Print Order Summary Docket | Printers with this option selected will print an Order Summary (see below) for all orders. |
| Dockets Reprint Time Frame |
If an order is changed within the timeframe defined, the dockets are reprinted. If changes are made outside this time frame, the dockets will not be reprinted. Allowing you to make communication with the kitchen faster when errors/changes are made, but not alerting them when you are sorting out a bill after service. New printers added in the Venue Manager default to 900 seconds (15 minutes). Note: You can manually reprint dockets for a specific order through EPoS. |
| Print receipts | Allow tills to print receipts at this printer. |
Replacing a Broken Printer
If you are replacing an old printer with a new one bought from Kobas, there is no need to change any settings on Kobas Cloud!
The printer will arrive pre-programmed to the previous printer’s IP address, and you will simply need to plug the printer in and connect all the wires – the power cable, the network cable, and any external items eg. a till drawer. Once this is complete and the printer is turned on, it will take the place of the previous printer on the network and work as needed.
What can you print?
| Receipts | Printed and given to customers, either before (bills) or after (receipts) payment. |  |
|
Dockets (Checks / Tickets) |
Instructions for an order to be made, and can be directed to different places as needed within the venue (usually kitchens and bars). |  |
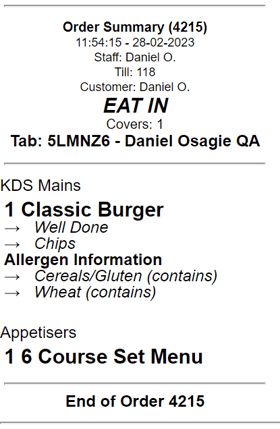
| Order Summary |
Similar to dockets but include all elements of the order, allergens, and customer information. These are useful for the collection window of takeaways.
You need to select which printers print summaries (Administration > Venue Settings > Settings > Preparation) by selecting Edit on the printer and turning the settings on or off. Summaries will always print at all printers turned on for this when selected on EPoS. |
 |
Top Tip: You can decide whether the EPoS Item Name or the EPoS Item Public Name is used in-venue (on receipts, dockets, EPoS, KDS and CFS) by toggling the setting within Administration > Venue Settings > Settings > Sales & Marketing > Preparation Instructions.
Receipt Settings
Defining where and when receipt print
You can customise when and where your receipts print, as well as what they look like. This is completed within Administration > Venue Settings > Settings on the Tills tab.
You can choose a Primary Printer where your receipts print for that till. If you do not define a primary printer, the till user will be able to decide where to print each receipt (useful for tablets on table service). Select your till, click Edit and scroll down to the Printing section of the popup.
- Print receipt when a tab is settled? – ticking this box will mean that a receipt is printed every time a tab is settled/paid.
- Print receipt when an order is settled? – ticking this box will mean that a receipt is printed every time an order is settled/paid.
We usually advise to keep these boxes unticked – it will save paper and stop any unnecessary receipts being printed for customers that don’t want them.
Top Tip: You can always print a receipt for a closed tab or order on EPoS by heading to Admin > View Orders or View Tabs.
Defining how receipts look
To customise how your receipts look, again head back to Administration > Venue Settings > Settings, and choose the Sales & Marketing tab.

Top Tip: The codes can be used to format the text in the bottom of your receipt:
- <b> Use this around text to make it bold. </b>
- <br> use to add a line space
- <center> Use this make text centre aligned. </center>
- <p> Use this to add paragraph formatting. </p>
- <strong> Use this where something is important </strong>
Note: Please note that the image for CIC Online Ordering email receipts has a different setting, please see here.
- Upload your logo under Header Image to include this at the top of your receipts.
- You can also choose to omit your venue name from the receipt (useful if your image already contains your name)
- Choose the layout of your receipt (Compact or Detailed) and decide whether to include tips. You can hover over the “i” symbol for more information on each of these settings.
- If you are using the Kobas customer loyalty rewards system, points will be displayed in the footer of the receipt and can be activated/deactivated in: Kobas System Preferences > Show preferences in: Loyalty accrues points
- You can update your physical address, telephone number or VAT number on a receipt here: Administration > Venues > Settings > Details or Financial Settings
- To customise the text at the bottom of the receipt, add your preferred message into the text box. You can use the following HTML tags in this box:
<b> </b> - any text between these tags will show as bold
<br> - adds a single line break
<center></center> - any text between these tags will be aligned in the centre of the receipt
<p></p> - text within these tags are treated as a paragraph. There will be a blank line above and below.
<strong></strong> - this is used to add emphasis. In this case, any text between these tags will show as bold
Where to find receipts
Receipts are stored in the Daily Sales by Order Report. You can find this report by navigating to Reports > Revenue Analysis > Daily Sales by Order. Once you’ve selected a date and venue, click on the View button to continue. Under the Receipt column, you’ll notice a green paper icon, which will display the receipt when clicked.

Docket Settings
Two levels of rules will dictate where dockets print:
| 1 | EPoS Item / Category | To print a docket for an item, you must first set that item to print at a specific printer. This can be done in bulk by category or individually per item. |
| 2 | Printer Rules | You can then set more complex rules about which dockets print on which printers based on various settings once the above rules are in place. |
Setting EPoS Item / Category Rules
Go to Administration > Venue Settings > Settings and choose the Preparation tab. Choose your printer and press Assign:

Here, you can assign entire Lead Types or Categories to this printer by ticking the box next to each one.
In the above example, this is a Kitchen Printer and needs to print all food items, however, Snacks are kept behind the bar. So we have stopped Snacks from printing at "Kitchen Printer", and we would instead choose this category to be printed at the Bar printer.
This can be overridden in each EPoS Item within the EPoS Items (PLU). Choose the item, then the Printing tab:

In the first dropdown, choose the venue at which you would like this item to print, and in the second dropdown, choose the desired printer. You can also remove a printer that has been automatically assigned to the category, for that individual item.
Setting Printer Rules
With the above item rules in place, you can now refine which dockets print where and when. By going to Administration > Venues > Settings > Printer Rules you will be able to view, edit, toggle and delete your rules:

When creating or editing a rule, you will need to first name the rule and choose the printers this applies to. Then decide which elements you wish to include (Order Source, Tills, Consumption Mode or Seating Area), by simply unticking the "print all" checkbox and choosing "Only Print" or "Suppress" from your selection. Finally, choose the times this rule will apply.

Legacy Rules:
You will see any rules previously created in Till > Manage Printer Suppression pages as "Legacy rules":
These should be deleted and re-created in the new rule section.
Troubleshooting
As with all hardware, it is unfortunately likely that you will encounter an issue at some point. Certain hardware malfunctions are often unavoidable, but taking care of your printers will help extend their already robust lifespan.
Keeping them clean, regularly emptying any paper clippings which may have built up and only using good quality paper/ribbons will do a great deal to prevent sudden jams or breakdowns during service.
Printers themselves do a pretty good job of telling you what’s wrong with them, so if your printer stops working you generally have a good idea as to why, but here are some basic steps you can follow to try and bring it back to life:
- Ensure the printer is powered on. Power it off for 10 seconds and then on again for good measure.
- Check for paper jams or paper outages.
- Discover if it is using USB or LAN, and ensure the cable is connected to the printer and till/wall correctly.
- If it is a USB printer, check that the till it is associated with is powered on and that the EPoS is running correctly.
- Close and reload the EPoS for good measure.
If you need any more help with managing your printers, please don't hesitate to get in touch with our Support Help Desk.
Visit Setting up Tills individually in your venue.
Visit Setting up PDQs.
Return to Training for Administrators.